The Humble Bundle is awesome as always. What is there not to like about cross platform (including Linux) and DRM free games? Plus buying helps support worthy charities like EFF and Child’s Play.
Category: Linux
Test IE virtual machines made easy
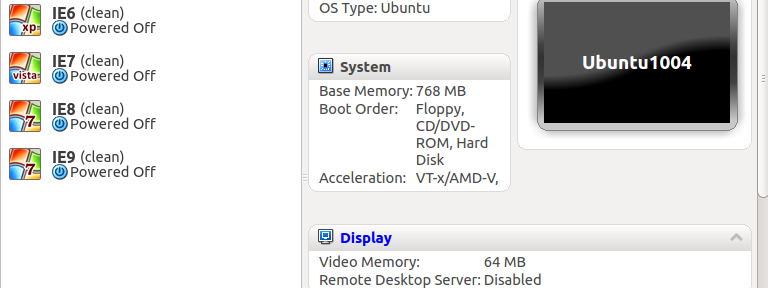
I just have to take a minute and thank @xdissent et al. for the amazing work done on ievms. I was able to install IE 6,7,8 and 9 virtual machines without hardly any work on my part.
I am running Ubuntu 12.04, and after uninstalling the virtualbox package found in the standard repository and installing the one found here, I simply ran the command in the readme, went to bed, and in the morning I was greeted with this in my VirtualBox window.
So far, each of them has worked without issue.
How to load test your web site or application with siege

Your mileage may vary, but this worked well for me. I wanted to test one of our sites under load. Our sites generally get a lot of traffic, so when we move from staging to production we have to keep in mind that we’re about to go from 1 or 2 developers hitting the pages to thousands of people.
I’ve previously used Apache Benchmark (ab) to load test, but it’s fairly limited. It can only test one page. I did a bit of digging and found siege. It was perfect for what I wanted to do. I wanted to submit my site to a heavy load, over a long period of time, and see what happened. I also wanted semi-realistic traffic, and with a few well-typed commands, I was able to create a file that siege can read that contained *exactly* the traffic from our site.
I used this to read the last 1000 hits from our apache logs:
tail -1000 /var/log/apache2/access.log | awk '{print "http://mysite.com" $8}' > /tmp/siege-urls.txtIt’s pretty simple, but I’ll break it down. The following gives me the last 1000 lines from the log. Your log might be in a different location, or named something else. If you want fewer lines, or more lines, change the 1000 to something else.
tail -1000 /var/log/apache2/access.log
Then, pipe the output of the above to awk and print out the url. In our apache logs, the url was in the eighth position. I also appended the site’s domain to the output, since the apache log does not contain that information (at least not in the format I wanted).
| awk '{print "http://mysite.com" $8}'Lastly, save it to a file for later use.
> /tmp/siege-urls.txt
Next, I used this file to place the site under load. In the example below, I used -i for “internet” mode, where siege randomly reads a line from the file and requests it from the server. I also used only 4 concurrent users or worker threads. If you ramp up the concurrency, you can really put a lot of strain on the server.
siege -i -c 4 -f /tmp/siege-urls.txt
When the siege is underway, you’ll get output that looks like this:
HTTP/1.1 200   0.53 secs:    6926 bytes ==> /some/url?some=params
HTTP/1.1 200   0.54 secs:    7132 bytes ==> /some/other/url?other=params
HTTP/1.1 500   0.13 secs:     521 bytes ==> /some/url?some=params
HTTP/1.1 200   0.64 secs:    7133 bytes ==> /some/other/url?other=params
HTTP/1.1 500   0.13 secs:     521 bytes ==> /some/other/url?other=params
HTTP/1.1 404   0.09 secs:     431 bytes ==> /some/url?some=params
I paid close attention to the 404s and the 500 errors. They indicated that I was getting requests that were erroring out for some reason. Sometimes, those errors are simply bots that grab a hold of old urls and continue to request them. Sometimes, they are cause for concern.
Hitting Control-C ends the siege and you then get output like below.
Lifting the server siege...      done.
Transactions:		         125 hits
Availability:		       88.03 %
Elapsed time:		       29.18 secs
Data transferred:	        1.18 MB
Response time:		        0.41 secs
Transaction rate:	        4.28 trans/sec
Throughput:		        0.04 MB/sec
Concurrency:		        1.77
Successful transactions:         101
Failed transactions:	          17
Longest transaction:	        3.13
Shortest transaction:	        0.08
I also found it useful to look at top and a few other tools on the server while the siege was underway. In our case, I was interested in passenger’s memory consumption, so I used passenger-memory-status and passenger-status.
Photo Credit: Martin Addison, Demonstrating the Trebuchet
Hard disk filling up? Check the MySQL binlog.
 Last night our monitoring system started throwing errors about a hard drive filling up on one of our servers. Nothing out of the ordinary was going on, but I was doing some maintenance on one of the sites and removing some old spam comments from the system. We use wordpress, and it provides a handy empty spam option, so I figured I’d use that rather than using good old, reliable SQL. That was my first mistake.
When emptying the spam comments, wordpress issues one DELETE statement for each comment. So, not only does it take forever it also had a side effect I was not expecting. It quickly increases the size of the binary logs.
You see, MySQL has a feature called binary logging. It’s an essential feature that serves at least two purposes. One is data recovery. If you have a binary log, you can restore a database from an backup and then tell MySQL to run through the log and bring your db back up to date. The other is replication. The binlogs are used to create a master/slave relationship between two databases. The slave db pulls the binary logs from the master and then can be an exact copy to provide performance benefits and high availability.
Of course, when the alarms started going off, I didn’t suspect that they were in any way related to any of this. Deleting things is supposed to make a database smaller, right? What I eventually discovered was that the binlogs on the server had grown to 46GB. Considering we only had about 2 gigs worth of real data in the system, I had a configuration issue to track down.
It turned out to be simple. Along the way, someone had commented out a line in the my.cnf file.
#expire_logs_days = 14
So, our binlogs had been slowly piling up since that line was commented out… Sometime in early 2010 according to the date on the oldest log. Ouch. Uncommenting it, and restarting MySQL brought the size down considerably. Now we have room to spare again.
Another mystery solved. Now to seek out the next!
Why is udev renaming my network interfaces?
It was driving me nuts. I was setting up a few virtual servers and the network interfaces were not showing up. I looked in dmesg and there were some odd lines that looked like this.
udev: renamed network interface eth1 to eth2

udev: renamed network interface eth0_rename to eth1
It turns out that udev that takes care of matching up the network interfaces to the physical hardware so the same hardware will always get the same device ids. So, in order to save myself time, instead of installing the Ubuntu again on each VM, I just copied the HD from one machine to the next. The old VM had different MAC addresses for the interfaces saved in the udev config. So, with the help of this post, I deleted /etc/udev/rules.d/70-persistent-net.rules and it stopped doing the rename.
Asus Laptop Reclaimed
I’ve successfully installed Debian Linux on an old Asus Laptop. My wife used it for a few years, but she was trying to use it for word processing, and a few of the keys stick every now and then. It’s been a goal of mine to get it running a newer version of linux, but the CD drive is bad, so installing from a iso is out of the question. I kept meaning to install from usb drive, but the only one we have that didn’t have files I cared about on it was only 128 MB.
Anyway, I got a 1 GB usb drive from my insurance agent. Score! Oh, they still have the road atlases, but the free stuff has gotten considerably cooler. I followed the instructions here and it worked like a charm: http://bit.ly/dAKhWJ
PHP Safe Mode
I just ran into a problem with a WordPress blog I was setting up. I couldn’t upload any images or files to it. It turns out, my hosting provider, Nearly Free Speech.net, uses PHP safe_mode by default. It’s not that difficult to overcome, but it can be confusing when you run into it. Basically, it adds one additional level of protection to the classic user/group/other protection scheme in unix. Normally, all you need to do to allow a directory or file to be writable is to change the group to the same group that the web server is running under. For NFS.net, this is the “web” group. However, with PHP safe_mode, this doesn’t quite cut it. You also need to make sure the script that is doing the writing is also in the “web” group. A quick and dirty way to do this would be the following commands.
$ cd /home/public

$ chgrp -R web *

$ cd /home/public/wp-content/

$ mkdir uploads

$ chgrp web uploads/

$ chmod g+w uploads/
The first chgrp is the “quick and dirty” part. That sets the group for all your files to web. It’s much safer to find out which scripts are actually doing the writing and set only those to the web group. NFS.net was nice enough to write this up as well in a blog post a few years back. Writing Files in PHP


